I wanted to contribute to ReactJS.org website, (which is a new React JS documentation site announced on Twitter.) as a happy new React user.
Setting up ReactJS.org environment on Windows slightly challenging but quite worth it.
I'd like to show you how to get ReactJS.org page up and running on Windows 10.
TL;DR
Download source code, install NPM packages and verify the site works.
Initial Steps - Download source code
- Create a fork of ReactJS.org on GitHub.
- Go to ReactJS.org GitHub page.
- Create a new fork by clicking on the Fork button on the right.

- Go to newly created fork
- https://github.com/<<YOUR\_GITHUB\_ID>>/reactjs.org/
- Clone the fork
- by copying the repository path and,
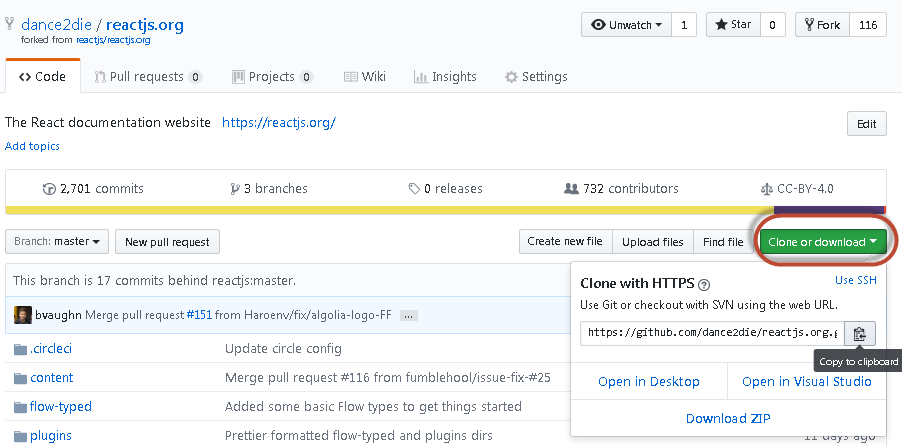
- and running git clone command - git clone https://github.com/<<YOUR_GITHUB_ID>>/reactjs.org.git
- Go to the cloned directory - cd reactjs.org
- by copying the repository path and,
- Check out a branch - git checkout -b <<branch name>>
| C:\misc\Sources\GitHub\reactjs.org>git checkout -b issue70 | |
| Switched to a new branch 'issue70' | |
| C:\misc\Sources\GitHub\reactjs.org>git branch | |
| * issue70 | |
| master | |
| C:\misc\Sources\GitHub\reactjs.org> |
Node-Gyp NPM package installation issue
Now you got the source, let's install NPM packages using yarn.
But it will fail due to node-gyp issue.
| C:\misc\Sources\GitHub\reactjs.org>yarn | |
| yarn install v1.1.0 | |
| [1/5] Validating package.json... | |
| [2/5] Resolving packages... | |
| warning Resolution field "react@16.0.0" is incompatible with requested version "react@^15.6.0" | |
| warning Resolution field "react-dom@16.0.0" is incompatible with requested version "react-dom@^15.6.0" | |
| [3/5] Fetching packages... | |
| info fsevents@1.1.2: The platform "win32" is incompatible with this module. | |
| info "fsevents@1.1.2" is an optional dependency and failed compatibility check. Excluding it from installation. | |
| [4/5] Linking dependencies... | |
| warning "gatsby-react-router-scroll@1.0.1" has incorrect peer dependency "react@^0.14.0 || ^15.0.0". | |
| warning "gatsby-react-router-scroll@1.0.1" has incorrect peer dependency "react-dom@^0.14.0 || ^15.0.0". | |
| warning "postcss-cssnext@2.11.0" has unmet peer dependency "caniuse-db@^1.0.30000652". | |
| warning "react-router@4.1.1" has incorrect peer dependency "react@^15". | |
| warning "react-router-dom@4.1.1" has incorrect peer dependency "react@^15". | |
| warning "redbox-react@1.4.2" has incorrect peer dependency "react@^0.14.0 || ^15.0.0". | |
| warning "redbox-react@1.4.2" has incorrect peer dependency "react-dom@^0.14.0 || ^15.0.0". | |
| warning "request-promise@4.2.2" has unmet peer dependency "request@^2.34". | |
| warning "request-promise-core@1.1.1" has unmet peer dependency "request@^2.34". | |
| [5/5] Building fresh packages... | |
| [1/3] ⠠ uws | |
| [2/3] ⠐ pngquant-bin | |
| [3/3] ⠐ sharp: not ok | |
| [-/3] ⠐ waiting... | |
| error C:\misc\Sources\GitHub\reactjs.org\node_modules\sharp: Command failed. | |
| Exit code: 1 | |
| Command: node-gyp rebuild | |
| Arguments: | |
| Directory: C:\misc\Sources\GitHub\reactjs.org\node_modules\sharp | |
| Output: | |
| C:\misc\Sources\GitHub\reactjs.org\node_modules\sharp>if not defined npm_config_node_gyp (node "C:\Program Files\nodejs\node_modules\npm\bin\node-gyp-bin\\..\..\node_modules\node-gyp\bin\node | |
| -gyp.js" rebuild ) else (node "" rebuild ) | |
| gyp info it worked if it ends with ok | |
| gyp info using node-gyp@3.6.2 | |
| gyp info using node@8.5.0 | win32 | x64 | |
| gyp ERR! configure error | |
| gyp ERR! stack Error: Can't find Python executable "C:\misc\Python\Python 3.5\python.EXE", you can set the PYTHON env variable. | |
| gyp ERR! stack at PythonFinder.failNoPython (C:\Program Files\nodejs\node_modules\npm\node_modules\node-gyp\lib\configure.js:483:19) | |
| gyp ERR! stack at PythonFinder.<anonymous> (C:\Program Files\nodejs\node_modules\npm\node_modules\node-gyp\lib\configure.js:508:16) | |
| gyp ERR! stack at C:\Program Files\nodejs\node_modules\npm\node_modules\graceful-fs\polyfills.js:284:29 | |
| gyp ERR! stack at FSReqWrap.oncomplete (fs.js:153:21) | |
| gyp ERR! System Windows_NT 6.1.7601 | |
| gyp ERR! command "C:\\Program Files\\nodejs\\node.exe" "C:\\Program Files\\nodejs\\node_modules\\npm\\node_modules\\node-gyp\\bin\\node-gyp.js" "rebuild" | |
| gyp ERR! cwd C:\misc\Sources\GitHub\reactjs.org\node_modules\sharp |
(In my case, I was missing Python 2.7)
"node-gyp" is required to run ReactJS.org. Luckily Node-Gyp Windows documentation provides two ways to install it.
I recommend using NPM command since it's easier.
After successfully installing "node-gyp", run yarn again and it will install packages without an issue.
| C:\misc\Sources\GitHub\reactjs.org>yarn | |
| yarn install v1.1.0 | |
| [1/5] Validating package.json... | |
| [2/5] Resolving packages... | |
| warning Resolution field "react@16.0.0" is incompatible with requested version "react@^15.6.0" | |
| warning Resolution field "react-dom@16.0.0" is incompatible with requested version "react-dom@^15.6.0" | |
| [3/5] Fetching packages... | |
| info fsevents@1.1.2: The platform "win32" is incompatible with this module. | |
| info "fsevents@1.1.2" is an optional dependency and failed compatibility check. Excluding it from installation. | |
| [4/5] Linking dependencies... | |
| warning "gatsby-react-router-scroll@1.0.1" has incorrect peer dependency "react@^0.14.0 || ^15.0.0". | |
| warning "gatsby-react-router-scroll@1.0.1" has incorrect peer dependency "react-dom@^0.14.0 || ^15.0.0". | |
| warning "postcss-cssnext@2.11.0" has unmet peer dependency "caniuse-db@^1.0.30000652". | |
| warning "react-router@4.1.1" has incorrect peer dependency "react@^15". | |
| warning "react-router-dom@4.1.1" has incorrect peer dependency "react@^15". | |
| warning "redbox-react@1.4.2" has incorrect peer dependency "react@^0.14.0 || ^15.0.0". | |
| warning "redbox-react@1.4.2" has incorrect peer dependency "react-dom@^0.14.0 || ^15.0.0". | |
| warning "request-promise@4.2.2" has unmet peer dependency "request@^2.34". | |
| warning "request-promise-core@1.1.1" has unmet peer dependency "request@^2.34". | |
| [5/5] Building fresh packages... | |
| success Saved lockfile. | |
| Done in 50.49s. |
Verify that the site works
Now to verify you need to run yarn check-all, which you need to run after making changes to the site.
But let's run it to make sure that the site is working.
| C:\misc\Sources\GitHub\reactjs.org>yarn check-all | |
| yarn run v1.1.0 | |
| $ yarn prettier && yarn lint && yarn flow | |
| flow-typed/gatsby-link.js 151ms | |
| ... | |
| src/utils/sectionList.js 3ms | |
| src/utils/slugify.js 2ms | |
| src/utils/toCommaSeparatedList.js 12ms | |
| No errors! | |
| Done in 9.80s. |
After making a change to the source code (pick and choose any issues you can work on),
Create a Pull Request (PR)
A Pull Request (PR) is a way of notifying the repository owner to merge your change into their source tree.
After a code change, stage it and commit it.
| git add -A && git commit -m "Fixed issue 70 on URL..." |
Be as descriptive for the commit message by adding URL and what's fixed as well as issue # you were working on.
Now, push the change to your fork.
| # example | |
| git push origin issue70 |
Push steps are documented on ReactJS.org page.
If everything went well, go to GitHub fork page and create a PR. If you are not unsure how to, refer to the official GitHub documentation, Creating a pull request - User Documentation.
After generating a PR, you will see a PR on ReactJS.org Pull requests tab.
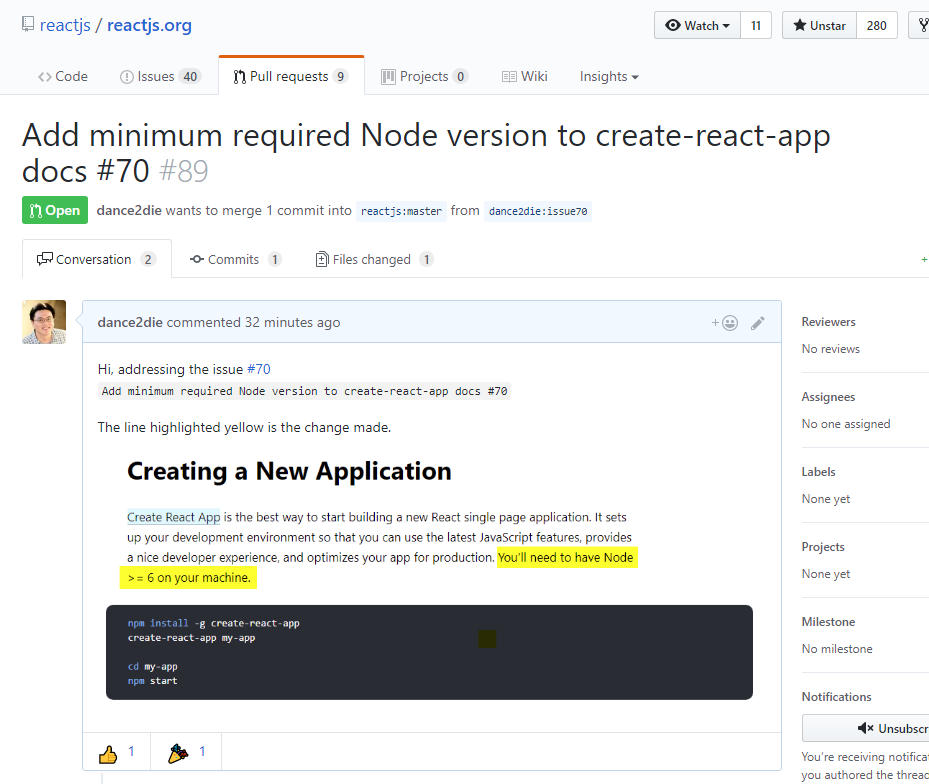 Make sure to include a screenshot of what's changed in your PR if your change is cosmetic.
Not long after your PR is created, a Facebook bot will ask you to sign a Contributor License Agreement.
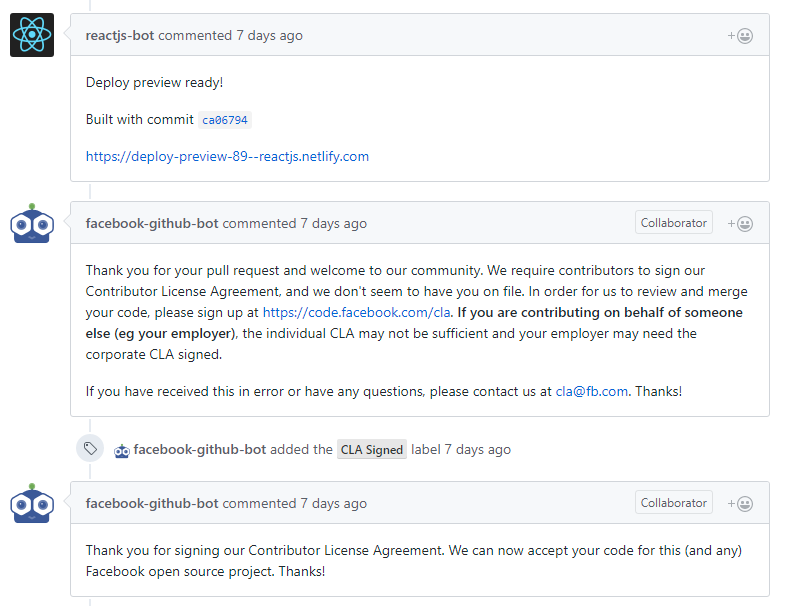
After you sign the agreement, the bot will verify and leave another comment in about an hour.
Once your change is accepted, it will be merged.
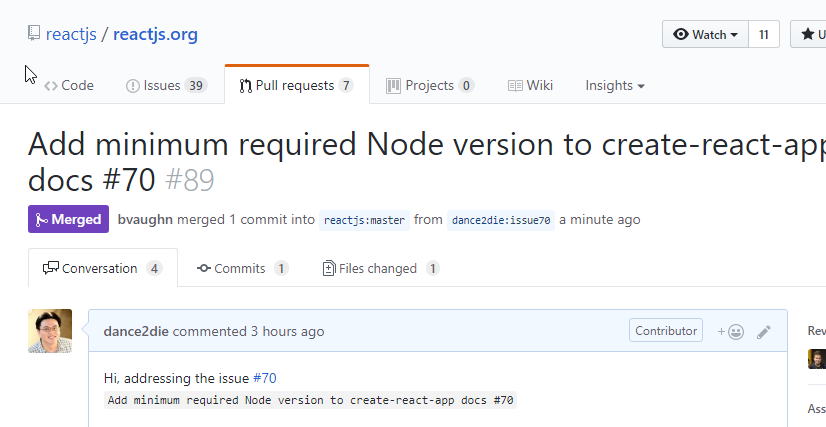
Congratulations! You've contributed to reactjs.org webpage! (I am not exactly sure how long it takes for the PR to go live, yet. Let me know if you know the cycle.)
Conclusion
Sorry to scare you in the beginning of the post. But it's actually as easy as forking a repository, install NPM packages, make a change, and create a PR.
This post is based on the feedback I left on GitHub after being asked by Brian Vaughn.
update on 10/16/2017
yarn check-all now works on Windows, so that part of the post is removed, thus easier to set up now.