_Photo by Kelly Sikkema on _Unsplash
There isn't a way to monitor stickiness of a component in CSS (position: sticky).
This nice article on Google, An event for CSS position:sticky shows how to emulate sticky events in vanilla JavaScript without using scroll event but using IntersectionObserver.
I will show how to create React components to emulate the same behavior.
Table of Contents
- Prerequisite
- What we are building
- Using sticky event components
- Implementing Sticky Components
- Resources
Prerequisite
This article is based on An event for CSS position:sticky, which also provides a nice demo and explanation on how it was implemented as well as the source code.
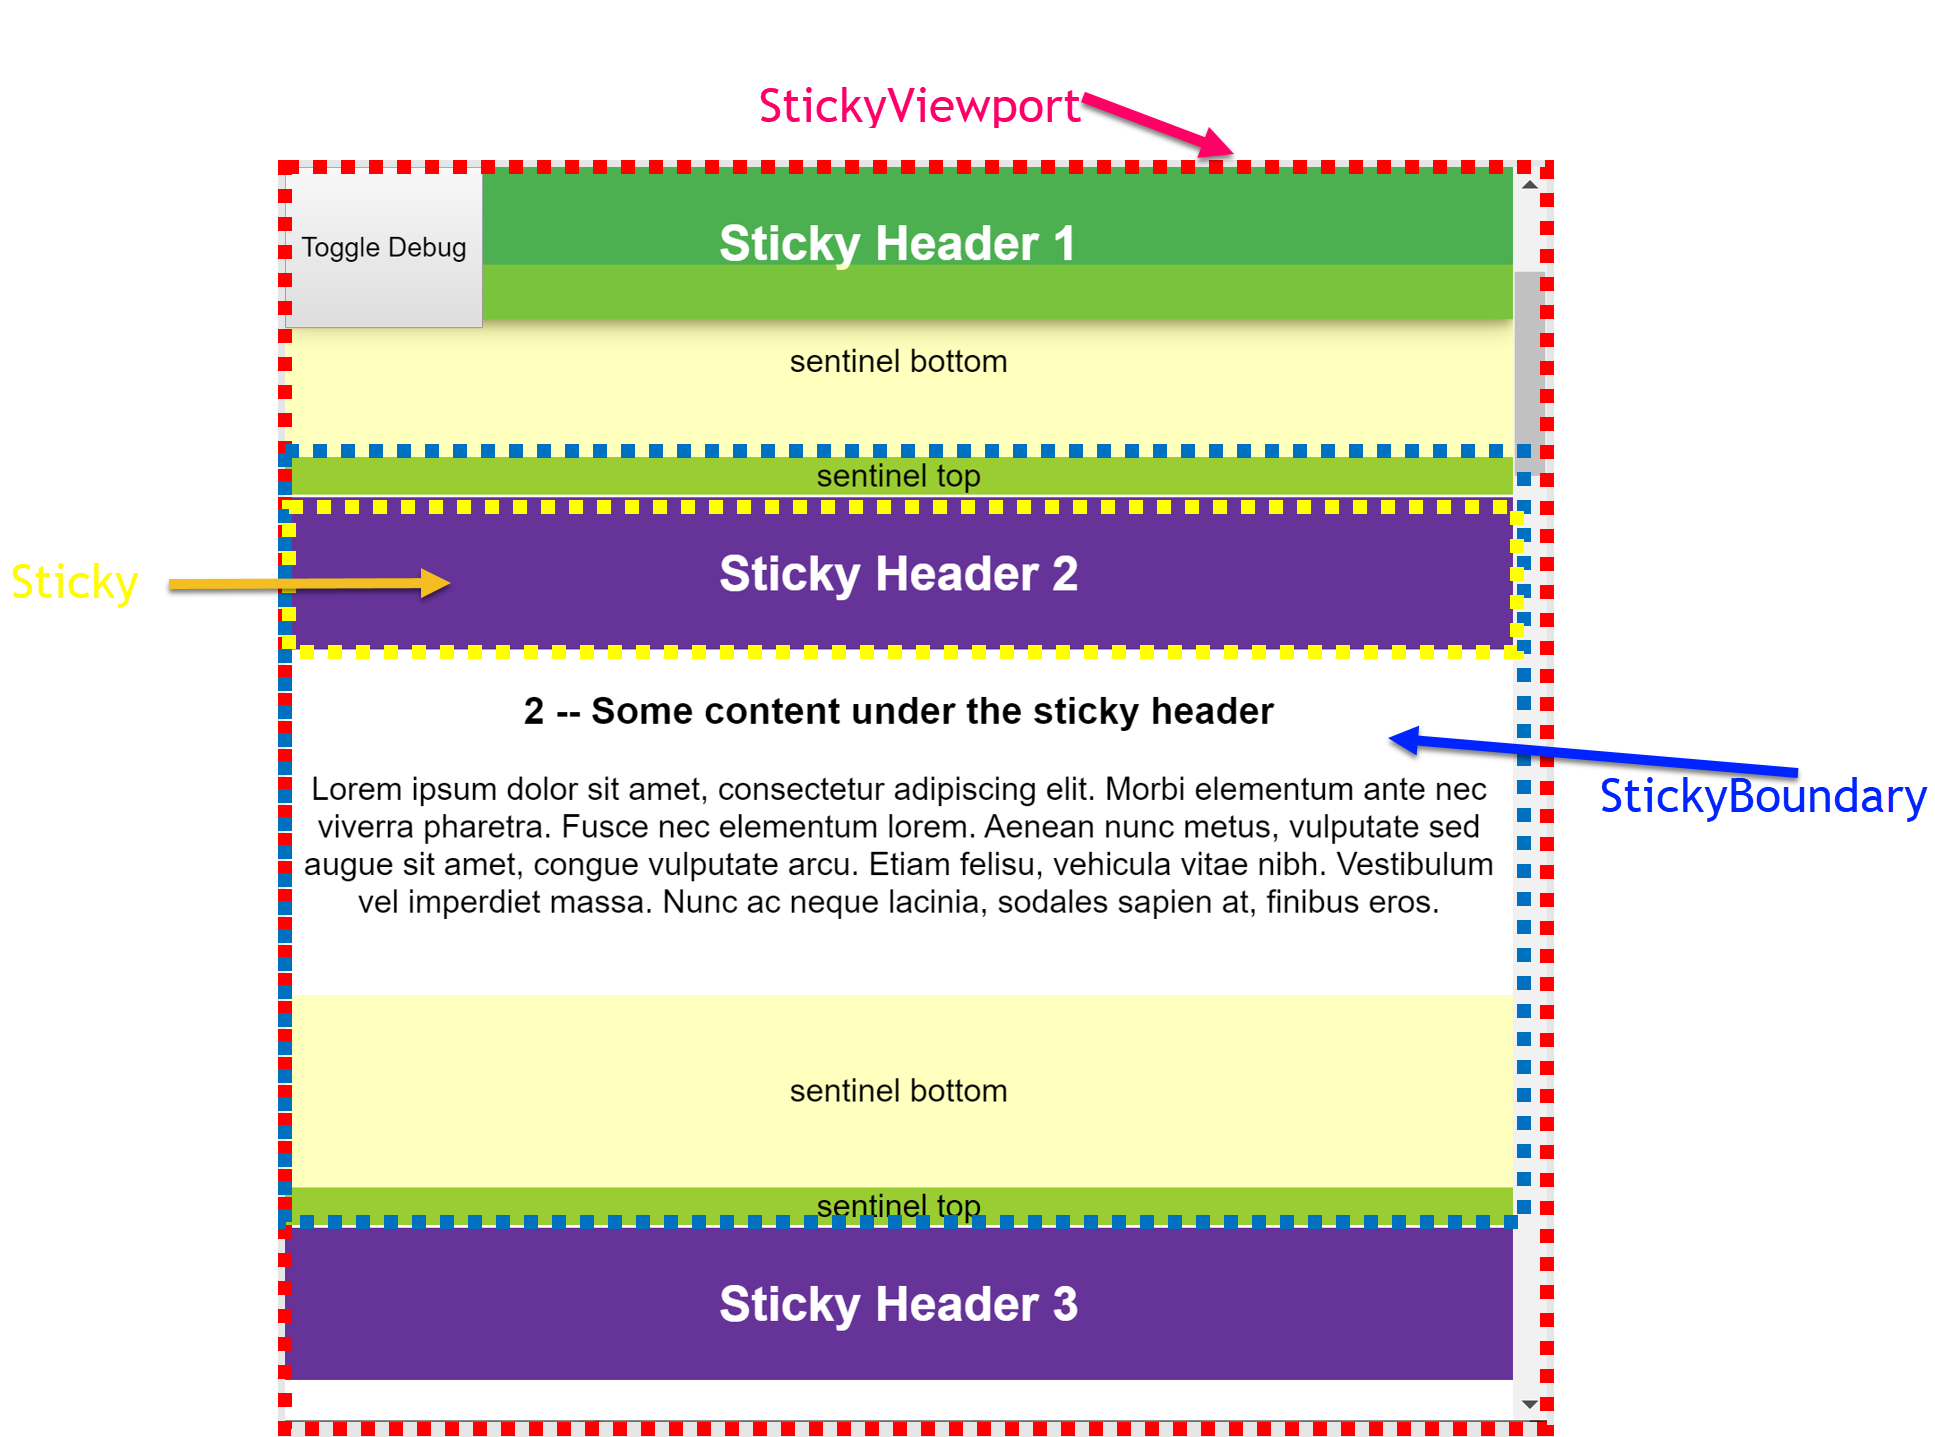
The basic idea is that, you add top & bottom sentinels around the sticky boundary, and observe those sentinels using [IntersectionObserver](https://developer.mozilla.org/en-US/docs/Web/API/IntersectionObserver).
Left is the terms used in the linked article above and the right is corresponding component name used here.
- Scrolling Container -> <StickyViewport />
- Headers -> <Sticky />
- Sticky Sections -> <StickyBoundary />
What we are building
Before moving on, let's see what we are building.
Sticky headers styles are changed as they stick and unstick without listening to scroll event, which can cause site performance issue if not handled correctly.
Here is the working Sandbox.
https://codesandbox.io/embed/react-sticky-javascript-refactored-w8otj You can click on Toggle Debug button to show sentinels.
You can see that the sticky headers change the color and the box shadow styles.
Let's see the usage of sticky components.
Using sticky event components
Here is the how one might use the component to observe un/stuck events.
| function App() { | |
| // 5️⃣ Event handlers for "un/stuck" events | |
| // "type" is either "stuck" or "unstuck" | |
| // while the "target" is the DOM element, on which the un/stuck event happened. | |
| // Use this to make changes to the style or do any manipulations you want to do | |
| const handleChange = ({ target, type }) => { | |
| if (type === "stuck") { | |
| target.style.backgroundColor = "#4caf50"; | |
| target.style.boxShadow = | |
| "0 6px 10px 0 rgba(0, 0, 0, 0.14), 0 1px 18px 0 rgba(0, 0, 0, 0.12), 0 3px 5px -1px rgba(0, 0, 0, 0.4)"; | |
| } else { | |
| target.style.backgroundColor = "rebeccapurple"; | |
| target.style.boxShadow = ""; | |
| } | |
| }; | |
| // Or handle each change individually | |
| const handleStuck = target => { | |
| // target.style.backgroundColor = '#4caf50' | |
| // target.style.boxShadow = | |
| // '0 6px 10px 0 rgba(0, 0, 0, 0.14), 0 1px 18px 0 rgba(0, 0, 0, 0.12), 0 3px 5px -1px rgba(0, 0, 0, 0.4)' | |
| }; | |
| const handleUnstuck = target => { | |
| // target.style.backgroundColor = 'rebeccapurple' | |
| // target.style.boxShadow = '' | |
| }; | |
| const stickySectionElements = Array.from({ length: 3 }, (_, i) => i + 1).map( | |
| key => ( | |
| // 2️⃣ Specify the boundary, in which sticky component should be placed under. | |
| <StickyBoundary key={key} | |
| 3️⃣ Here, you can observe the un/stuck events. "onChange" occurs for both "un/stuck" events. | |
| onStuck={handleStuck} | |
| onUnstuck={handleUnstuck} | |
| onChange={handleChange} | |
| > | |
| 4️⃣ Make this element "sticky" and render it as <h1 /> (default is <div />) | |
| <Sticky id={key} as="h1"> | |
| Sticky Header {key} | |
| </Sticky> | |
| <h3>{key} -- Some content under the sticky header</h3> | |
| <article> | |
| Lorem ipsum dolor sit amet, consectetur adipiscing elit. Morbi | |
| ... | |
| </article> | |
| </StickyBoundary> | |
| ) | |
| ); | |
| return ( | |
| <div className="App"> | |
| 1️⃣ Specify the Viewport to observe and render it as <main /> (defualt is <div />) | |
| <StickyViewport as="main"> | |
| {stickySectionElements} | |
| </StickyViewport> | |
| </div> | |
| ); | |
| } |
Usage
- Specifies the viewport in which the IntersectionObserver should base on "threshold" with (root). By default, IntersectionObserver's root is set to the viewport. as specifies which element the DOM should be rendered as. It's rendered as main in this case where default is div.
- shows the section within which the sticky component sticks. (This is where "top/bottom" sentinels are added as shown in the Google doc)
- The boundary is where the un/stuck events can be subscribed via following props.
- Render a sticky component as "h1" - This is the component that will stick within the StickyBoundary on scroll.
- shows event handlers. handleChange handler changes the background color and the box shadow depending on sticky component's stickiness.
Now let's see how each component is implemented.
Implementing Sticky Components
I will start from top components toward the bottom because I've actually written the rendered component (how the components should be used) before writing down implementations for them.
I wasn't even sure if it'd work but that's how I wanted the components to work.
⚛ StickyViewport
Let's take a look at how it's implemented.
| function StickyViewport({ children, as = "div", ...rest }) { | |
| return ( | |
| // 1️⃣ To provide context for Sticky component tree | |
| <StickyProvider> | |
| 2️⃣ Real work starts here | |
| <StickyRoot as={as} {...rest}> | |
| {children} | |
| </StickyRoot> | |
| </StickyProvider> | |
| ); | |
| } | |
| function StickyRoot({ children, as: Component = "div", ...rest }) { | |
| // 3️⃣ Get actions provided in `StickyViewport` via `StickyProvider` | |
| const dispatch = useStickyActions(); | |
| // 4️⃣ Add the viewport reference to be used later in child component | |
| to be set as `root` option of IntersectionObserver | |
| const addContainerRef = containerRef => { | |
| dispatch.setContainerRef(containerRef); | |
| }; | |
| return ( | |
| <Component ref={addContainerRef} {...rest}> | |
| {children} | |
| </Component> | |
| ); | |
| } |
- It's basically a container to provide a context to be used within the Sticky component tree ("the tree" hereafter).
- The real implementation is within StickyRoot, which is not used (or made available via module export) in the usage above.
- While StickyViewport makes context available within the tree without rendering any element, StickyRoot is the actual "root" (of IntersectionObserver option).
- To make the container ref available down in the tree, action dispatcher is retrieved from the custom hook, useStickyActions (,which is a dispatch from useReducer) in the provider implementation.
- Using the dispatcher.setContainerRef, we make the reference available in the tree for the child components.
Now let's see what state and actions StickyProvider provides in the tree.
⚛ StickyProvider
The context is implemented using the pattern by Kent C. Dodd's article, How to use React Context effectively.
Basically, you create two contexts, one for the state, another for dispatch and create hooks for each.
The difference in StickyProvider is that, instead of exposing raw dispatch from useReducer directly, I've encapsulated it into actions.
I'd recommend reading Kent's article before moving on.
| import React, { createContext, useContext, useReducer } from "react"; | |
| // 1️⃣ | |
| const initialState = { | |
| containerRef: null, | |
| stickyRefs: new Map(), | |
| }; | |
| // No operation | |
| const noop = () => {}; | |
| // 2️⃣ | |
| const initialDispatch = { | |
| setContainerRef: noop, | |
| addStickyRef: noop | |
| }; | |
| const StickyStateContext = createContext(initialState); | |
| const StickyDispatchContext = createContext(initialDispatch); | |
| const ActionType = { | |
| setContainerRef: "set container ref", | |
| addStickyRef: "add sticky ref", | |
| }; | |
| // 3️⃣ | |
| function reducer(state, action) { | |
| const { type, payload } = action; | |
| switch (type) { | |
| case ActionType.setContainerRef: | |
| // Reassigning a new ref, will infinitely re-load! | |
| return Object.assign(state, { | |
| containerRef: { current: payload.containerRef } | |
| }); | |
| case ActionType.addStickyRef: | |
| const { topSentinelRef, bottomSentinelRef, stickyRef } = payload; | |
| state.stickyRefs.set(topSentinelRef.current, stickyRef); | |
| state.stickyRefs.set(bottomSentinelRef.current, stickyRef); | |
| return Object.assign(state, { | |
| stickyRefs: state.stickyRefs | |
| }); | |
| default: | |
| return state; | |
| } | |
| } | |
| // 4️⃣ | |
| function StickyProvider({ children }) { | |
| const [state, dispatch] = useReducer(reducer, initialState); | |
| const setContainerRef = containerRef => | |
| dispatch({ type: ActionType.setContainerRef, payload: { containerRef } }); | |
| const addStickyRef = (topSentinelRef, bottomSentinelRef, stickyRef) => | |
| dispatch({ | |
| type: ActionType.addStickyRef, | |
| payload: { topSentinelRef, bottomSentinelRef, stickyRef } | |
| }); | |
| // 5️⃣ | |
| const actions = { setContainerRef, addStickyRef }; | |
| return ( | |
| <StickyStateContext.Provider value={state}> | |
| <StickyDispatchContext.Provider value={actions}> | |
| {children} | |
| </StickyDispatchContext.Provider> | |
| </StickyStateContext.Provider> | |
| ); | |
| } | |
| // 6️⃣ | |
| function useStickyState() { | |
| const context = useContext(StickyStateContext); | |
| if (context === undefined) | |
| throw Error('"useStickyState should be used under "StickyStateContext'); | |
| return context; | |
| } | |
| // 7️⃣ | |
| function useStickyActions() { | |
| const context = useContext(StickyDispatchContext); | |
| if (context === undefined) | |
| throw Error( | |
| '"useStickyActions should be used under "StickyDispatchContext' | |
| ); | |
| return context; | |
| } | |
| const initialSectionValues = { | |
| topSentinelRef: null, | |
| bottomSentinelRef: null | |
| }; | |
| // 8️⃣ | |
| const StickySectionContext = createContext(initialSectionValues); | |
| export { | |
| StickyProvider, | |
| useStickyState, | |
| useStickyActions, | |
| ActionType, | |
| StickySectionContext | |
| }; |
- containerRef refers to the ref in StickyRoot, which is passed to the IntersectionObserver as the root option while stickyRefs refers to all <Sticky /> elements, which is the "target" passed to event handlers.
- setContainerRef is called in the StickyRoot to pass to StickyBoundary while addStickyRef associates TOP & BOTTOM sentinels with <Sticky /> element.
We are observing TOP & BOTTOM sentinels so when <StickyBoundary /> fires events, we can correctly retrieve the target sticky element. - I am not returning a new reference but updating the existing "state" using Object.assign(state,...), not Object.assign({}, state, ...).
Returning a new state would infinitely run the effects, so only stickRefs are updated as updating the state reference would cause containerRef to be of a new reference, causing a cascading effect (an infinite loop). - StickyProvider simply provides states raw, and
- creates "actions" out of dispatch, which makes only allowable actions to be called.
- and
- are hooks for accessing state and actions (I decided not to provide a "Consumer", which would cause a false hierarchy as render prop would.).
- StickySectionContext is just another context to pass down TOP & BOTTOM sentinels down to Sticky component, with which we can associate the sticky target to pass to the event handlers for onChange, onUn/Stuck events. It was necessary because we are observing TOP & BOTTOM sentinels and during the declaration, we don't know which sticky element we are monitoring.
Now we have enough context with state & actions, let's move on and see implementations of child components, StickyBoundary, and Sticky.
⚛ StickyBoundary
The outline of StickyBoundary looks as below.
| // no operation | |
| const noop = () => {}; | |
| // 1️⃣ This is where the event fires | |
| function StickyBoundary({ | |
| as = "section", | |
| onChange = noop, | |
| onStuck = noop, | |
| onUnstuck = noop, | |
| children, | |
| ...rest | |
| }) { | |
| const Component = as; | |
| // 2️⃣ Create TOP & BOTTOM sentinel refs | |
| const topSentinelRef = useRef(null); | |
| const bottomSentinelRef = useRef(null); | |
| // 3️⃣ Compute sentinel offsets | |
| const { bottomSentinelHeight, topSentinelMarginTop } = useSentinelOffsets( | |
| topSentinelRef | |
| ); | |
| // 4️⃣ Observe TOP sentinels and fire un/stuck/change events | |
| useObserveTopSentinels(topSentinelRef, { | |
| events: { | |
| onChange, | |
| onStuck, | |
| onUnstuck | |
| } | |
| }); | |
| // 5️⃣ Observe BOTTOM sentinels and fire un/stuck/change events | |
| useObserveBottomSentinels(bottomSentinelRef, { | |
| events: { | |
| onChange, | |
| onStuck, | |
| onUnstuck | |
| } | |
| }); | |
| // 6️⃣ Save the sentinels to associate with the target later on | |
| const value = { topSentinelRef, bottomSentinelRef }; | |
| // 7️⃣ `StickyBoudnary` simply wraps each event section with TOP & BOTTOM sentinels | |
| return ( | |
| <StickySectionContext.Provider value={value}> | |
| <Component className={styles.sticky__section} {...rest}> | |
| <div | |
| ref={topSentinelRef} | |
| style={{ marginTop: `-${sentinelMarginTop}` }} | |
| className={styles.sticky__sentinel_top} | |
| > | |
| sentinel top | |
| </div> | |
| {children} | |
| <div | |
| ref={bottomSentinelRef} | |
| style={{ height: `${targetHeight}`}} | |
| className={styles.sticky__sentinel_bottom} | |
| > | |
| sentinel bottom | |
| </div> | |
| </Component> | |
| </StickySectionContext.Provider> | |
| ); | |
| } |
- The boundary is where you'd subscribe stickiness changes.
- Create TOP & BOTTOM sentinel references, with which, we observe the stickiness of sticky components.
- Compute sentinel offsets.
- This hook observes top sentinel and fires events depending on the boundary calculation in relation to the viewport.
- This hook observes BOTTOM sentinel and fires events depending on the boundary calculation in relation to the viewport.
- Saving the sentinel refs to associate with sticky component somewhere down in the tree.
- StickyBoundary simplys wraps the children with TOP & BOTTOM sentinels and applies computed offsets calculated in step 3.
So basically StickyBoundary wraps children with TOP & BOTTOM sentinels, with which we can tell whether a sticky component is stuck or unstuck.
Now let's implement hooks.
🎣 useSentinelOffsets
| // 1️⃣ | |
| function useSentinelOffsets(topSentinelRef) { | |
| const { stickyRefs } = useStickyState(); | |
| const [bottomSentinelHeight, setBottomSentinelHeight] = useState(""); | |
| const [topSentinelMarginTop, setTopSentinelMarginTop] = useState(""); | |
| // 2️⃣ | |
| useEffect(() => { | |
| // 3️⃣ | |
| const stickyNode = stickyRefs.get(topSentinelRef.current); | |
| // 4️⃣ | |
| const topStyle = window.getComputedStyle(stickyNode); | |
| const getProp = name => topStyle.getPropertyValue(name); | |
| const paddingtop = getProp("padding-top"); | |
| const paddingBottom = getProp("padding-bottom"); | |
| const height = getProp("height"); | |
| const marginTop = getProp("margin-top"); | |
| // 5️⃣ | |
| const bottomSentinelHeight = `calc(${marginTop} + | |
| ${paddingtop} + | |
| ${height} + | |
| ${paddingBottom})`; | |
| setBottomSentinelHeight(bottomSentinelHeight); | |
| setTopSentinelMarginTop(marginTop); | |
| }, [stickyRefs, topSentinelRef]); | |
| // 6️⃣ | |
| return { bottomSentinelHeight, topSentinelMarginTop }; | |
| } |
- TOP margin & BOTTOM height calculation requires the top sentinel ref.
- This is where the calculation occurs whenever sticky elements, and top sentinel ref changes ([stickyRefs, topSentinelRef]).
- We've associated sticky elements with TOP & BOTTOM sentinels via context, so fetch the sticky node associated with the top sentinel.
- Get the sticky element styles required for calculation.
- Calculate the BOTTOM sentinel height.
- We make the calculated states available to the caller.
🎣 useObserveTopSentinels
| function useObserveTopSentinels( | |
| topSentinelRef, | |
| // 1️⃣ | |
| { events: { onStuck, onUnstuck, onChange } } | |
| ) { | |
| // 2️⃣ Get the viewport root & the stick refs associated with the TOP sentinels | |
| const { stickyRefs, containerRef } = useStickyState(); | |
| // 3️⃣ Start observing TOP sentinels | |
| useEffect(() => { | |
| if (!containerRef) return; | |
| if (!containerRef.current) return; | |
| const root = containerRef.current; | |
| const options = { threshold: [0], root }; | |
| // 4️⃣ Create observers to monitor TOP sentinels | |
| // Please refer to the Google doc on how this works. | |
| const observer = new IntersectionObserver(entries => { | |
| entries.forEach(entry => { | |
| const target = stickyRefs.get(entry.target); | |
| const targetInfo = entry.boundingClientRect; | |
| const rootBoundsInfo = entry.rootBounds; | |
| let type = undefined; | |
| // 5️⃣ the bottom of TOP sentinel moved up, so fire the "stuck" event. | |
| if (targetInfo.bottom < rootBoundsInfo.top) { | |
| type = "stuck"; | |
| onStuck(target); | |
| } | |
| // 6️⃣ the TOP sentinel is in the visible area. So fire "unstuck" event | |
| if ( | |
| targetInfo.bottom >= rootBoundsInfo.top && | |
| targetInfo.bottom < rootBoundsInfo.bottom | |
| ) { | |
| type = "unstuck"; | |
| onUnstuck(target); | |
| } | |
| // 7️⃣ Fire the event if either "un/stuck" even has been fired. | |
| type && onChange({ type, target }); | |
| }); | |
| }, options); | |
| // 8️⃣ Observe all TOP sentinels | |
| const sentinel = topSentinelRef.current; | |
| sentinel && observer.observe(sentinel); | |
| return () => { | |
| observer.unobserve(sentinel); | |
| }; | |
| }, [topSentinelRef, onChange, onStuck, onUnstuck, stickyRefs, containerRef]); | |
| } |
OK, this is now where it gets messy a bit. I've followed the logic in the Google doc so will be brief and explain only relevant React codes.
- These are the events to be triggered depending on the TOP sentinel position.
- We have saved the references via context actions. Retrieve the container root (viewport) and the stick refs associated with each TOP sentinel.
- This is where observation side effect starts.
- The logic was "taken" from the Google doc, thus will skip on how it works but focus on events.
- As the TOP sentinel is moved up, we fire the "stuck" event here.
- And when the TOP sentinel is visible, it means the sticky element is "unstuck".
- We fire whenever either unstuck or stuck is even fired.
- Observe all TOP sentinels that are registered.
🎣 useObserveBottomSentinels
The structure is about the same as useObserveTopSentinels so will be skipping over the details.
The only difference is the logic to calculate when to fire the un/stuck event depending on the position of BOTTOM sentinel, which was discussed in the Google doc.
| function useObserveBottomSentinels( | |
| bottomSentinelRef, | |
| { events: { onStuck, onUnstuck, onChange } } | |
| ) { | |
| const { stickyRefs, containerRef } = useStickyState(); | |
| useEffect(() => { | |
| if (!containerRef) return; | |
| if (!containerRef.current) return; | |
| const root = containerRef.current; | |
| const options = { threshold: [1], root }; | |
| const observer = new IntersectionObserver(entries => { | |
| entries.forEach(entry => { | |
| const target = stickyRefs.get(entry.target); | |
| const targetRect = target.getBoundingClientRect(); | |
| const bottomSentinelRect = entry.boundingClientRect; | |
| const rootBounds = entry.rootBounds; | |
| const intersectionRatio = entry.intersectionRatio; | |
| let type = undefined; | |
| if ( | |
| bottomSentinelRect.top >= rootBounds.top && | |
| bottomSentinelRect.bottom <= rootBounds.bottom && | |
| intersectionRatio === 1 && | |
| targetRect.y === 0 | |
| ) { | |
| type = "stuck"; | |
| onStuck(target); | |
| } | |
| if (bottomSentinelRect.top <= rootBounds.top) { | |
| type = "unstuck"; | |
| onUnstuck(target); | |
| } | |
| type && onChange({ type, target }); | |
| }); | |
| }, options); | |
| const sentinel = bottomSentinelRef.current; | |
| sentinel && observer.observe(sentinel); | |
| return () => { | |
| observer.unobserve(sentinel); | |
| }; | |
| }, [bottomSentinelRef, onChange, onStuck, onUnstuck, stickyRefs, containerRef]); | |
| } |
Now time for the last component, Sticky, which will "stick" the child component and how it works in conjunction with aforementioned components.
⚛ Sticky
| function Sticky({ children, as = "div", className = "", ...rest }) { | |
| // 1️⃣ Get TOP & BOTTOM sentinels to associate with | |
| const { topSentinelRef, bottomSentinelRef } = useContext( | |
| StickySectionContext | |
| ); | |
| const dispatch = useStickyActions(); | |
| // 2️⃣ Associate the current element with TOP & BOTTOM sentinels | |
| // so that we can retrieve correct child target element | |
| // from either a top sentinel or a bottom sentinel | |
| const addStickyRef = stickyRef => { | |
| dispatch.addStickyRef(topSentinelRef, bottomSentinelRef, stickyRef); | |
| }; | |
| const Component = as; | |
| // 3️⃣ No magic - Just apply the "sticky" position using class | |
| return ( | |
| <Component | |
| ref={addStickyRef} | |
| className={styles.sticky + className || ` ${className}`} | |
| {...rest} | |
| > | |
| {children} | |
| </Component> | |
| ); | |
| } |
- First we get the TOP & BOTTOM sentinels to associate with
- so that we can retrieve correct child target element from either a top sentinel or a bottom sentinel.
- We simply wrap the children and apply position: sticky around it using a class module (not shown here).
Let's take a look at the working demo one more time.
Resources
- Google Documentation
- MDN
- IntersectionObserver
- IntersectionObserver root option
- Sandbox