Introduction
Harness Engineering (HE), and Loop Engineering (LE) not to mention LLM OPs has been a hot topic, and seems daunting.
I will show you concepts of HE using simple Python code (without using libraries like LangChain), as for some examples make concepts easier to digest.
Basically this "tutorial" will mix a bit of "explanation" in diataxis 4 quadrant diagram.
In the next blog entry, I will show how this toy AI agent compares to Hermes Agent and differs.
Sean's AI Stories has many good resources on HE/LE/LLM Ops, etc.
I will refer you to Sean's diagram on HE/LE in You Can Learn AI Agent Harness & Loop Engineering In 19 Min | LLM Ops, Eval, Tracing, RAG for more comprehensive overview on HE, LE, Memory management, and LLM OPs.
Why understand the mechanics beneath agent frameworks?
Do you remember when you first read about software design patterns, e.g. factory patterns, adaptor patterns, etc?
All the words, and diagrams make concepts harder than it looks.
But when you see codes for corresponding patterns, you recognize the pattern you might have had used.
People labeled it after discovering common patterns.
Same thing here with harness engineering. You might have had already done it just labeled so, so that we have a common terminology to communicate better.
What we are building
A basic python code using UV. No AI libraries such as LangChain.
If you know Python (or any programming languages), you should be able to follow through.
We will make an LLM call, then add some harness, and tools. Lastly, some memory persistence across sessions.
Scope Note
This tutorial builds a tiny tool-using agent to demo harness and model/tool loop. I ain't showing the full coding-agent workflow discussed in articles above. Additionally,
- No LLM OPs: this is a deep dive
- No embedding or vector databases
- I use SQLite for a persistent memory across sessions not as a source/context fed automatically or etherially
- No API authentication: I am using LM Studio with "Gemma 4 12B" hosted locally.
- because Anthropic/OpenAI/OpenRouter API call will make the code complex than required.
Mental Model: Short
Before going further, a short iteration of what harness engineering is.
To steer LLMs in a certain way, we need to provide contexts, and instructions (and refer to memory as needed). So the harness in this context is the surrounding setup. Model client, prompt & convo state, tools & dispatch, and constrols such as a turn limit.
In our code, the flow goes user -> [model -> tool] -> result -> model -> answer
- where [model -> tool] runs optionally in a loop
Tutorial
Below are the steps to follow with minimal explanation.
FYI: I am using Python 3.13
1. Create a project folder
We want to create a folder to create a python project.
- Go to a folder you want to create a project under.
- Create a project using uv like uv init PROJECT-NAME
- If you don't have UV, check out the official UV Installation doc
e.g. I created a project named toy-ai-agent
1PS C:\Users\dance2die\src\ai> uv init toy-ai-agent2Initialized project `toy-ai-agent` at `C:\Users\dance2die\src\ai\toy-ai-agent`
- cd into the folder: cd toy-ai-agent
- Create src folder
- Move main.py under src as src/main.py
- because uv init creates main.py at the top level
- and not to pollute the top-level
2. Make one LLM call
At top level project root, add httpx with uv add httpx: to make a call to local LLM
1PS C:\Users\dance2die\src\ai\toy-ai-agent> uv add httpx2Using CPython 3.13.63Creating virtual environment at: .venv4Resolved 8 packages in 171ms5Installed 7 packages in 55ms6 + anyio==4.15.17 + certifi==2026.7.228 + h11==0.16.09 + httpcore==1.0.910 + httpx==0.28.111 + idna==3.2012 + typing-extensions==4.16.0
Start with a single chat-completions request.
URL is from "[LM STUDIO SERVER] OpenAI-compatible" when you load a model from LM Studio.
- NOTE: Refer to your own IP for the URL
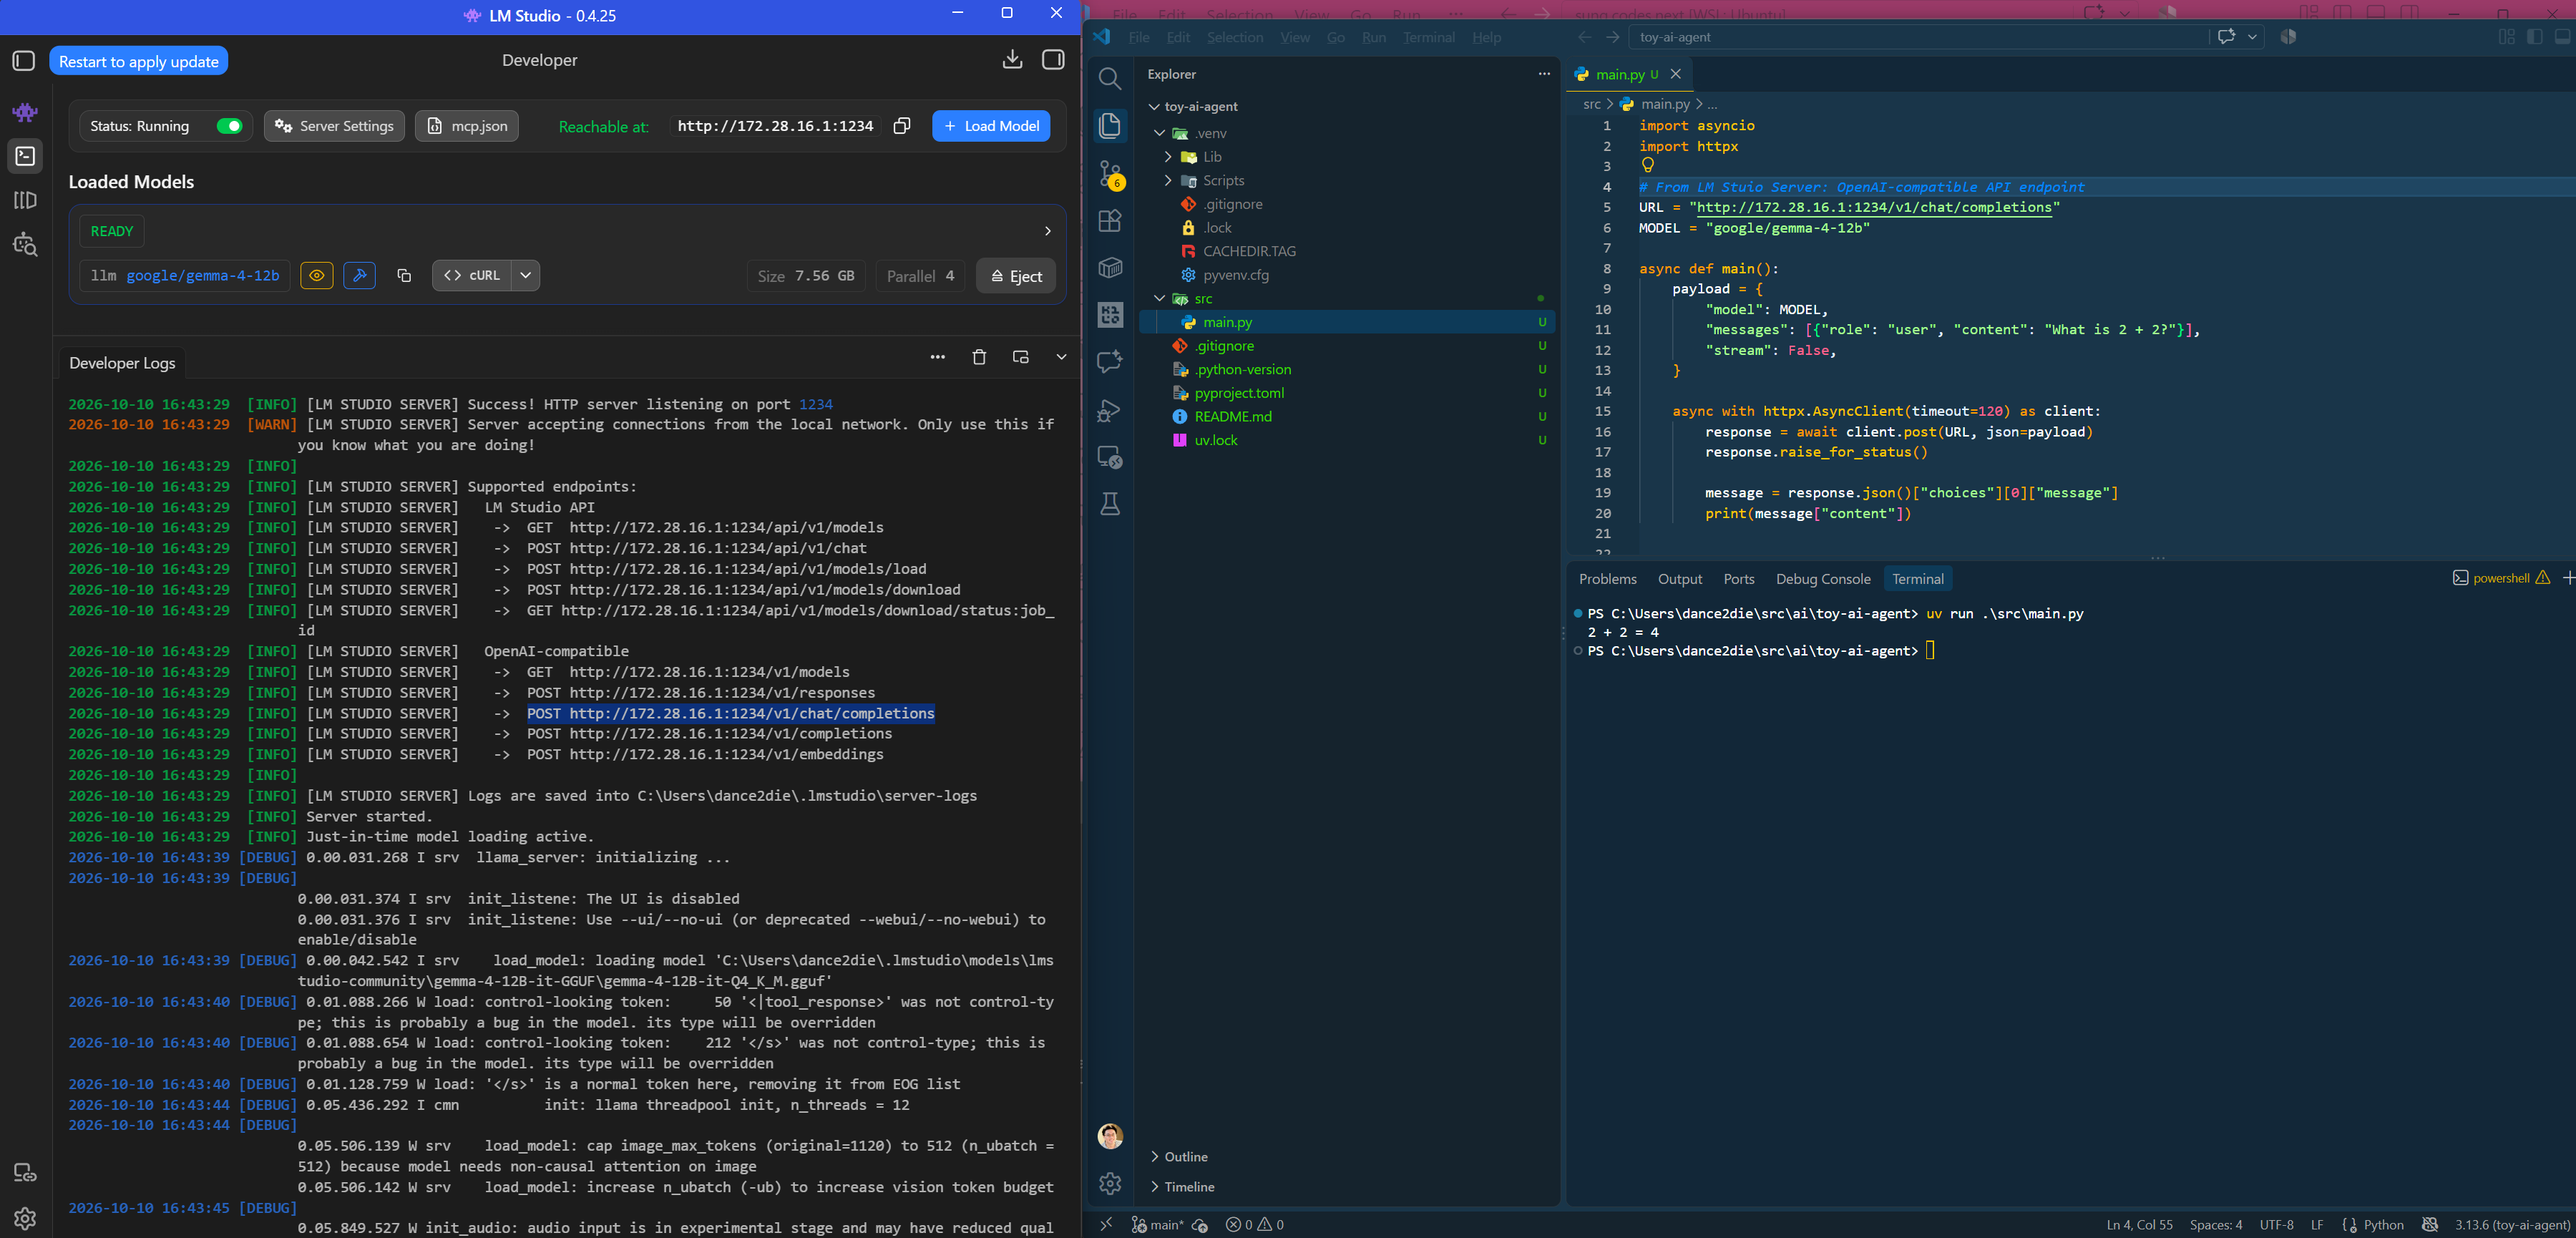
1# src/main.py2import asyncio3import httpx4
5# From LM Stuio Server: OpenAI-compatible API endpoint6URL = "http://172.28.16.1:1234/v1/chat/completions"7# LM Studio loaded this model8MODEL = "google/gemma-4-12b"9
10async def main():11    payload = {12        "model": MODEL,13        # The prompt is hard-coded initially14        # instead of getting it from a user15        "messages": [{"role": "user", "content": "What is 2 + 2?"}],16        "stream": False,17    }18
19    async with httpx.AsyncClient(timeout=120) as client:20        # Call LM Studio API Endpoint21        response = await client.post(URL, json=payload)22        response.raise_for_status()23
24        # Parse the LM Studio API endpoint output25        message = response.json()["choices"][0]["message"]26        print(message["content"])27
28
29if __name__ == "__main__":30    asyncio.run(main())
Run it from the project root folder:
uv run python src/main.py
It will show result like this
1PS C:\Users\dance2die\src\ai\toy-ai-agent> uv run .\src\main.py22 + 2 = 4
At this point, we made sure that the code can make LLM calls via API and we are ready to move onto adding harness.
3. Add the harness: REPL, model client, prompt, and conversation history
Adding harness here and let's get user's input with a REPL first in a forever loop.
Changed are
- REPL: read-eval-print loop
- Model Client: Abstracted LLM API call with ask_model
- Conversation History: Save the short-term context
1async def main():2    # Extracted "messages" from "payload".3    messages = [4        {"role": "system", "content": "Be concise."}5    ]6
7    async with httpx.AsyncClient(timeout=120) as client:8        # 1. REPL loop9        while True:10            user_prompt = input("Enter prompt (or quit)> ")11            if user_prompt.casefold() in {"quit", "exit", "q", "e"}:12                break13
14            # What we are passing to LLM15            messages.append({"role": "user", "content": user_prompt})16            # 2. Delegate work to LLM: abstracted LM Studio API call here17            response = await ask_model(client, messages)18            # Parse LM Studio JSON output19            answer = response.get("content") or ""20
21            # 3. Add the answer to the short-term context22            messages.append({"role": "assistant", "content": answer})23            print(f"Agent: {answer}")
ask_model is what we had before in main but just abstracted into a function.
1async def ask_model(client, messages):2 response = await client.post(3 URL,4 json={5 "model": MODEL,6 "messages": messages,7 "stream": False,8 },9 )10 response.raise_for_status()11 return response.json()["choices"][0]["message"]
Verify that your prompt works, and loops in REPL
1PS C:\Users\dance2die\src\ai\toy-ai-agent> uv run .\src\main.py2Enter prompt (or quit)> what is 2 + 2?3Agent: 44Enter prompt (or quit)> how about 2**3?5Agent: 86Enter prompt (or quit)> what's the capital of USA?7Agent: Washington, D.C.8Enter prompt (or quit)> quit
Now we have the very basic "harness".
- It accepts a user "input"
- Maintains a short-term in-process history
- Calls a model
- Displays the answer in REPL
We do not yet have a "turn limit" applied here yet.
We will get to that later when we get to add tools.
4. Add a tool: schema, allowlist, and Python function
A tool has two parts:
- A Python function: our program calls when it receives the request
- A schema (blueprint): tell the model what it may request
Start with a add tool, which simply adds two numbers.
- Create a subfolder tools and a file named __init__.py
- Add tool function
- Add schema
1# src/tools/__init__.py2
3# What is called when model requests to add4def add(a: int, b: int) -> int:5    return a + b6
7# Tool Schema: tell the model what it may request8ADD_TOOL = {9    "type": "function",10    "function": {11        "name": "add",12        "description": "Add two whole numbers.",13        "parameters": {14            "type": "object",15            "properties": {16                "a": {"type": "integer"},17                "b": {"type": "integer"},18            },19            "required": ["a", "b"],20            "additionalProperties": False,21        },22    },23}24
25# Configuration for the tools26TOOLS = [ADD_TOOL]27ALLOWED_TOOLS = {"add": add}28MAX_MODEL_TURNS = 10
The schema is not the function itself. It is a description sent to the model. The allowlist (ALLOWED_TOOLS) maps the requested tool name to the Python function we are willing to run.
Update ask_model() to send the schemas:
1from tools import TOOLS2
3
4async def ask_model(client, messages):5    response = await client.post(6        URL,7        json={8            "model": MODEL,9            "messages": messages,10            # Tools that the model can use11            "tools": TOOLS,12            "stream": False,13        },14    )15    response.raise_for_status()16    return response.json()["choices"][0]["message"]
The model can now return a tool_calls field. We need a dispatcher to validate and run those requests:
1# src/main.py2import asyncio3import httpx4import inspect5import json6from tools import TOOLS, ALLOWED_TOOLS7
8URL = ...9MODEL = ...10
11
12def run_tool(tool_call):13    name = tool_call["function"]["name"]14    # Verify if the model can use the tool15    function = ALLOWED_TOOLS.get(name)16    if function is None:17        raise ValueError(f"Unknown tool: {name}")18
19    args = json.loads(tool_call["function"]["arguments"])20
21    if not isinstance(args, dict):22        raise ValueError("Tool arguments must be a JSON object")23
24    # Verify if correct argument name and argument count passed by the model25    inspect.signature(function).bind(**args)26    # To see if tool is called27    print("Requested tool:", function.__name__, args)28    # Call the tool29    return function(**args)
This keeps the model from selecting arbitrary Python functions: only names in ALLOWED_TOOLS can be dispatched.
We are not running main.py yet because we have not implemented toolcall by the LLM yet.
Let's implement that next.
5. Add the loop that handles tool requests and results
A model response without tool calls is the final answer. If it contains tool calls, we append the model’s request, run each allowed tool, append each tool result, and ask the model again.
Add this function to src/main.py:
1# src/main.py2import asyncio3import httpx4import inspect5import json6from tools import TOOLS, ALLOWED_TOOLS, MAX_MODEL_TURNS7
8
9URL = ...10MODEL = ...11
12async def handle_user_messages(client, messages):13    # how many times (MAX_MODEL_TURNS) do we want to let LLM call tools?14    for turn in range(MAX_MODEL_TURNS):15        response = await ask_model(client, messages)16        tool_calls = response.get("tool_calls") or []17        # LLM did not request tool call18        if not tool_calls:19            answer = response.get("content") or ""20            messages.append({"role": "assistant", "content": answer})21            return answer22
23        # Do not begin more tool work on the final allowed model turn.24        if turn == MAX_MODEL_TURNS - 1:25            answer = "Stopped: reached the model-turn limit"26            messages.append({"role": "assistant", "content": answer})27            return answer28
29        # Save the tool call HISTORY to short-term lived context30        tool_request = {31            "role": "assistant",32            "tool_calls": tool_calls,33        }34        if response.get("content") is not None:35            tool_request["content"] = response["content"]36        messages.append(tool_request)37
38        for call in tool_calls:39            try:40                result = run_tool(call)41            except (ValueError, TypeError, KeyError) as error:42                result = f"Tool error: {error}"43
44            # Save the tool call RESULT to short-term lived context45            messages.append({46                "role": "tool",47                "tool_call_id": call["id"],48                "content": str(result),49            })50    return "Stopped: reached the model-turn limit."
Now change the REPL so each user prompt goes through the loop.
1answer = await handle_user_messages(client, messages)2print(f"Agent: {answer}")
So the main function looks like this.
1async def main():2    # Extracted "messages" from "payload".3    messages = [4        {"role": "system", "content": "Be concise."}5    ]6
7    async with httpx.AsyncClient(timeout=120) as client:8        # 1. REPL loop9        while True:10            user_prompt = input("Enter prompt (or quit)> ")11            if user_prompt.casefold() in {"quit", "exit", "q", "e"}:12                break13
14            # What we are passing to LLM15            messages.append({"role": "user", "content": user_prompt})16            # Abstracted LLM and tool calls17            answer = await handle_user_messages(client, messages)18            print(f"Agent: {answer}")
The assistant tool request and the tool result are both added to messages.
On the next model call, the model can use the returned result to generate its answer.
Verify that the add tool is called.
1PS C:\Users\dance2die\src\ai\toy-ai-agent> uv run .\src\main.py2Enter prompt (or quit)> 10 + 203Requested tool: add {'a': 10, 'b': 20}4Agent: 305Enter prompt (or quit)> what is 1 + 2?6Requested tool: add {'a': 1, 'b': 2}7Requested tool: add {'a': 1, 'b': 2}8Agent: 39Enter prompt (or quit)> quit
6. Add SQLite notes and simple keyword search
The conversation only lives in the running process. To store long-term memory (notes) after the program exits, let's store them in a small SQLite database.
Create a new file, src/tools/note.py.
1import sqlite32
3
4DB_PATH = "notes.db"5
6
7def init_db():8    """9    Create a new table only if it doesn't exist.10    """11    with sqlite3.connect(DB_PATH) as connection:12        connection.execute("""13            CREATE TABLE IF NOT EXISTS notes (14                id INTEGER PRIMARY KEY AUTOINCREMENT,15                content TEXT NOT NULL16            )17        """)18
19
20init_db()21
22
23def save_note(note: str) -> str:24    """25    Persist convo to a long-term memory26    """27    note = note.strip()28    with sqlite3.connect(DB_PATH) as connection:29        existing = connection.execute(30            "SELECT 1 FROM notes "31            "WHERE content = ? COLLATE NOCASE LIMIT 1",32            (note,),33        ).fetchone()34
35        if existing:36            return f"Already saved: {note}"37
38        connection.execute(39            "INSERT INTO notes (content) VALUES (?)",40            (note,),41        )42    return f"Saved the note: {note}"43
44
45def search_notes(query: str = "*") -> str:46    """47    Search long-term memory, or return all for "*".48    """49    with sqlite3.connect(DB_PATH) as connection:50        connection.row_factory = sqlite3.Row51        rows = connection.execute(52            "SELECT id, content FROM notes"53        ).fetchall()54    notes = [f"{row['id']}: {row['content']}" for row in rows]55
56    # return all notes57    if query == "*":58        return "\n".join(notes)59
60    matches = [61        note for note in notes62        if query.casefold() in note.casefold()63    ]64    if not matches:65        return "No matching notes found"66
67    return "\n".join(matches)
The search fetches the note rows and checks whether the query appears in each note. There is no semantic/vector search or automatic retrieval.
- you have to explicitly state to the model to refer to notes.
To let the model request these functions, add schemas for save_note and search_notes to the tool list.
And then add both functions to the allowlist.
e.g. the save schema looks like this:
1# src/tools/note.py2TOOLS = [{3 "type": "function",4 "function": {5 "name": "save_note",6 "description": "Save a note",7 "parameters": {8 "type": "object",9 "properties": {10 "note": {"type": "string"}11 },12 "required": ["note"],13 "additionalProperties": False14 }15 }16}, {17 "type": "function",18 "function": {19 "name": "search_notes",20 "description": "Search notes. Searching '*' means 'all notes'.",21 "parameters": {22 "type": "object",23 "properties": {24 "query": {"type": "string"}25 },26 "required": ["query"],27 "additionalProperties": False28 }29 }30}]
Use the same structure for search_notes, with a required string parameter named query. Then import the functions and schemas into src/tools/__init__.py.
1# src/tools/__init__.py2from tools.note import (3    save_note,4    search_notes,5    TOOLS as NOTE_TOOLS,6)7
8# What is called when model requests to add9def add(...)10
11ADD_TOOL = {...}12
13# Configuration for the tools14TOOLS = [ADD_TOOL, *NOTE_TOOLS]15ALLOWED_TOOLS = {16    "add": add,17    "save_note": save_note,18    "search_notes": search_notes,19}20
21# Maximum model responses for one user message, including tool requests.22# Multiple tool calls in one response count as one turn.23# Tool errors still consume the turn that requested them.24# If the final response requests tools, those tools are not executed.25MAX_MODEL_TURNS = 10
Finally, update the system instructions in the main function,
so the model knows when to use the note tools.
NOTE: It's out of scope to update the system message automatically when we add a new tool.
- Thus updated the system message manually here.
1# src/main.py2async def main():3 # Extracted "messages" from "payload".4 messages = [{5 "role": "system", 6 "content": """Be concise.7 Use add for addition.8 When asked to remember something, call save_note before confirming.9 When asked to recall a saved note, call search_notes before answering.10 Use query="*" to list all notes.11 Never claim a note was saved or found unless the tool result confirms it.12 """13 }]14...
The program creates notes.db at the project root. And also we do not want to commit it git.
Make sure to add it to .gitignore.
1#.gitignore2# Python-generated files3__pycache__/4*.py[oc]5build/6dist/7wheels/8*.egg-info9
10# Virtual environments11.venv12
13notes.db
You can verify by asking LLM to save notes and list them all.
Also you can ask it to refer to notes to generate an answer to your question
- e.g. ask about what to get at a cafe below.
1PS C:\Users\dance2die\src\ai\toy-ai-agent> uv run .\src\main.py2Enter prompt (or quit)> save note that i love "rose gold" color3Requested tool: save_note {'note': 'I love "rose gold" color'}4Agent: OK. I've saved that note for you.5Enter prompt (or quit)> save note that I love latte6Requested tool: save_note {'note': 'I love latte'}7Agent: OK. I've saved the note for you.8Enter prompt (or quit)> list all notes9Requested tool: search_notes {'query': '*'}10Agent: Here are your notes:111. I love "rose gold" color122. I love latte13Enter prompt (or quit)> make sure to get all new list items to give me recommendations on what to get at a cafe, intead of relying on short-term memory14Requested tool: search_notes {'query': '*'}15Agent: Based on all your preferences in your notes, you should order a latte! If you can find one served with rose gold accents or in a cup that matches your preference for that color, it would be the perfect choice for you.
If you restart your program, you can see that the notes persists across the sessions.
1PS C:\Users\dance2die\src\ai\toy-ai-agent> uv run .\src\main.py 2Enter prompt (or quit)> list all notes3Requested tool: search_notes {'query': '*'}4Agent: The saved notes are:51. I love "rose gold" color62. I love latte
Outro
We built a small runtime harness and model/tool loop.
We started off with making a single LLM call, convert it to a REPL, applying harness, and calling tools.
The concept here only covers surface of what Harness Engineering is.
In the next blog, I will show comparison between what we built and how Hermes Agent implements (similarly or differently).
Resources
The full source code is available at https://github.com/dance2die/blog-toy-ai-agent-demo